Good News! Those folks at HP have produced downloadable drivers for the Designjet 500 for use with Windows 8. You can find it HERE.
|
I've moved my workshop to Lindstrom MN where we have our retirement lake house. It's a sweet little lake town on the northern 2nd ring suburbs of the Twin Cities. They have a water tower in the shape of a coffee pot and the best donut bakery in the nation!
This change will make me get a lot more organized and keep me from buying too much inventory at once. So, for the summer I've decided to work only on HP Designjet 500 machines. Why? Because it is the most reliable machine I've worked with. Each Designjet series has its own special feature that make me love it and makes it the perfect machine for some people who have certain requirements. That said, the Designjet 500 is the one that has always been more reliable than any other...I've sold dozens of these and never had a call, concern or complaint. So, to make my summer easier and still be able to service my customers, I'm gearing down to just the Designjet 500 for the summer. My standard price for the 24" Designjet 500 is $700 and the 42" plotter is $900. They come with ink and a roll of paper and a quick training session. I have now had two separate users contact me about those USB extension cables. Both users tell me that they had their plotter printing fine, but wanted to move the plotter further from the computer and tried using a USB extension. Surprise! It stopped working. Why? Because even though their USB to parallel cable cord was BI-DIRECTIONAL as I've often preached in this blog, their extension wasn't...so the back and forth communication that the plotter needs to keep the image printing stops at the extension...Both users reported that when they took the extension out of the circuit everything started printing again.
If anyone has found a bona fide USB extension cord that is BI-DIRECTIONAL contact me and tell me all about it...I'll publish the info here.  · Loading the Driver: Turn off Firewall and Anti-Spyware/Anti-Virus programs
· Cables: Buy a Bidirectional USB to Parallel Cable · Ports: Choose the USB001 – NOT the LPT1 Port! · ERRORS: Power on while holding Enter & UP or Enter & Cancel · To Resuscitate Cartridges: hot water, wet towels, & shake · Load Paper: Just like toilet paper -- Up and over and pull out arm’s length before inserting. Don't worry about the extra paper as your plotter will cut it off after the successful paper loading. · Print to Scale: Use HP’s Zoom Smart -- And look at original document's properties to see what the original size is. · Garages: Cartridge on Left and Cutter on Right - Don't start your plotter unless both are in place. Don't manually move the carriage unless the plotter is OFF. However, you CAN manually move the cutter anytime. · Demo Prints: Via Menu or Setup & Cancel - A good way to tell if your problem is computer or plotter...run the demo print and if it prints ok the problem is caused by your computer or cable. · Avoid Errors: Turn OFF Pen Checking on Plotter Setup -- this is especially true of the 600, 650 and 750 Designjets. · Electrical: Leave plotter on BUT use a surge protector! Your plotter hibernates and doesn't use power unless it is actually processing and printing. · Speed: A 64 bit computer makes the printing faster -- Twice as fast as an older 32 bit processor. · Things The Plotter Princess can't be responsible for: o Reading the manual for you o Googling your problem – You can do it, too… o Setting up your network o Setting up your computer and software o Figuring out how to print to scale o The plotter bouncing in the back of your truck o Your staff not being able to figure it out Click on link below for a driver for 64bit systems that can be used with Windows 8 if you disable driver signing enforcement...watch the video for info on how to do that -- again see below...
pl532en.zip 1928 KB The above driver is not signed, and Windows 8 x64 by default enforces driver signing requirements. You can temporarily disable driver signing enforcement as shown in this video. BTW, I have used the above driver (or the one very much like it available here) with a Designjet 650c under Windows 8 x64. I did need to temporarily disable driver signing, but after the driver is installed there are no issues. This driver covers the following models:
I receive calls and emails from around the world. I do whatever I can to help everyone who contacts me, but when they mention MAC I'm like a kid being told to eat their vegetables...I know I should open up to it but instead I stick my fingers in my ears and sing "LA-LA-LA-LA!"
I really don't speak "MAC" and thus, it is best if I not try to help you with these things! However, I did find that HP is willing to share some info about using their products with MAC. Here's a link to an article that may help you. 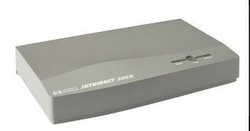 Taken from an HP Forum:
"This worked for me on a 450C I reconfigured to a 430 since black & white was sufficient for my needs and I didn't want to pay for the three color cartridges. I connected using a JetDirect 170X box I picked up on Ebay for < $20. I installed the JetDirect driver from the original installation disk first. This installed without any problems even though the disk lists "Windows NT, Windows 2000, Windows Server, Windows XP, Windows 98/Me, UNIX and Mac OS" as the operating systems and I'm running W7 64 bit. I then installed the printer from the "Devices and Printers" dialog. Choose "Add Printer", "Add a local printer" (although it seems counter-intuitive, do not use "Add a network, wireless or Bluetooth printer"), "Create New Port", "Standard TCIP Port", enter the IP address for the JetDirect box*. Continue with the new printer wizard dialogs and when you get to the the dialog to select the printer, select "Have Disk" and browse to the "pl532en" directory and select the OEMSETUP.INF file. Select DesignJet 450 from the list of printers displayed and complete the remainder of the printer installation dialog. * I knew the IP address of the JetDirect box since I had this same config running XP. If you are installing the JetDirect box for the first time, you'll need to set the IP address of the JetDirect by whatever means is available to you (JetDirect Web Admin tool). Supposedly pressing the test button on the back of the JetDirect box will print a config page with the IP address, but this did not work for me ("Ready" light flashes, but nothing is ever printed). You might also try this link for more info on configuring the JetDirect box. http://www.mikestechblog.com/joomla/networking-section/network-printing-category/52-how-to-configure... " And here's one more place to get info on this topic -- HP's website.  My favorite part of this sweet little hobby of mine is getting to meet creative young risk takers who are stepping out there and making a go of running their own business. These are the kinds of people who make our country great! Last week I met Kevin Grube of Grube Architects. I was fascinated by some of his designs that he shared with me. Check out his website and pass on his links and business info if you know of any projects that he should be involved in. Click the link above or the photo on the left to have his website open in another window.
 I have a friend, Cat Rosengren, who is an artist who makes handmade custom tiles for very important projects. She's an amazing artist who puts her heart and soul into each piece. Although she's located in Iowa at Lakota Tile Studio, she works on projects all over the nation. Every time I see photos of her latest projects I am in awe! If you are a designer, remodeler, contractor, interior decorator and happen on my blog for plotter things, why not serendipitiously find a great place to get a special project done for your client?
Go to www.LakotaTileStudio.com (Link will open in another window.) Here's an opportunity to be part of the Plotter Princess Army of Designjet Geeks...If you have Windows 8 and want to try to download Windows 7 Designjet drivers and see if you can get your Windows 8 computer to print to your old designjet, then check out this video and tell me if it works. I don't have Windows 8 so I can't test this myself but I do get a couple calls a week asking if it is possible to use Win8 with these old plotters:
Click Here to See the Video re: Loading Win 7 drivers in Win 8_ AND after you try it, you MUST report back using the COMMENTS section below! Well, I really can't force you, but it would be nice...and that's what we are all about here, being nice!
I've often described for others how I unclog dried up HP cartridges using soaking in a bowl of very hot water, violently shaking the soaked cartridge over the kitchen sink until I see ink splashes, then wetting 6 folded up paper towels and pressing the head of the cartridge down on the 1 inch thick folded wet towels and releasing the downward pressure very slowly so the release is creating a suction that pulls the dried clots out of the miniscule holes that are the "jet" part of the Designjet. This almost always works...
Additionally today I've found another tutorial on clearing clogged jets. This one is written by someone involved in "refilling" cartridges. He uses a combination of hot water, ammonia and a frying pan! You'll need to check it out for yourself. I'm thinking it just might work... Go here to check it out. HP is constantly re-designing their website which makes it hard for someone like me to keep up with where things are. If I'm having trouble, you may also be having the same difficulty. Here's a link to the one page that will give you almost all info you need about your plotter:
PDF files can contain layered content if they are created from layered documents by using applications such as Adobe InDesign. As a result, a single page of the PDF file can contain different layers with different content. If you print a PDF that contains layered content, only the layer that is currently visible onscreen is printed. Acrobat Pro and Pro Extended let you specify which layer is visible and printable. Merge or flatten the layers in the PDF to determine if one of the layers is causing the printing problem.
Note: Merging or flattening layers can't be undone. For this procedure, use a copy of your PDF. To determine which version of Acrobat you are using, choose Help > About Adobe Acrobat (Windows), or Acrobat > About Acrobat (Mac OS). For Acrobat 8 Professional or later:
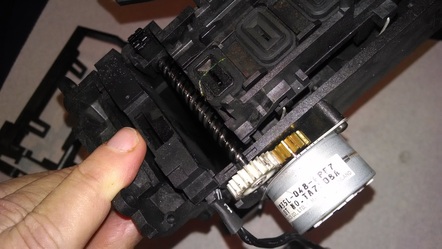 HP Designjets drop detectors are sensors that look at the drops coming out of each cartridge and pass or fail that cartridge. In the photo at the left my finger is pointing to the drop detector of a 750c. There's only one problem with most of these old drop detectors...they get covered in gooey ink and no longer work. You have 3 choices when you start getting errors related to drop detectors: 1. Set PEN CHECKING (via your menu, usually under Device/Plotter Set Up) to OFF. You don't need it, you know if your cartridges are working better than the 1997 drop detector does! 2. Remove and try to clean the drop detector...be warned there is a small circuit board hidden in the drop detector's black plastic casing so you can't just flush it with running water. But you can open the casing with a small flat knife via the plastic seam. Once open you can pull the circuit board out and wipe down the sensors and rinse the black plastic casing to get all the old ink out. (See below for photos relating to this procedure.) 3. Replace the drop detector by buying a new or used one online... NOTE: Both cleaning and replacing the drop detector require that you re-calibrate the drop detector...look it up in your service manual. If you can't find it, contact me and I'll help. 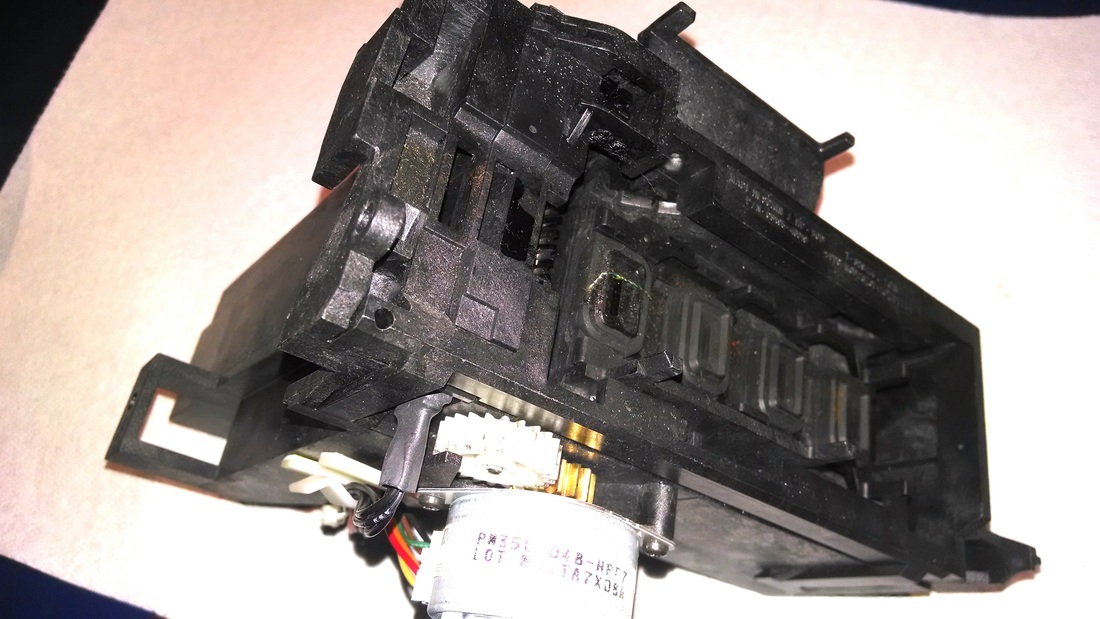 The service station from a 750c.  Undo the four tiny screws on the top edge and remove the retangular black "frame" that hold the service station together.  Here's the drop detector. Lift it out...there was nothing but the frame holding it in place. 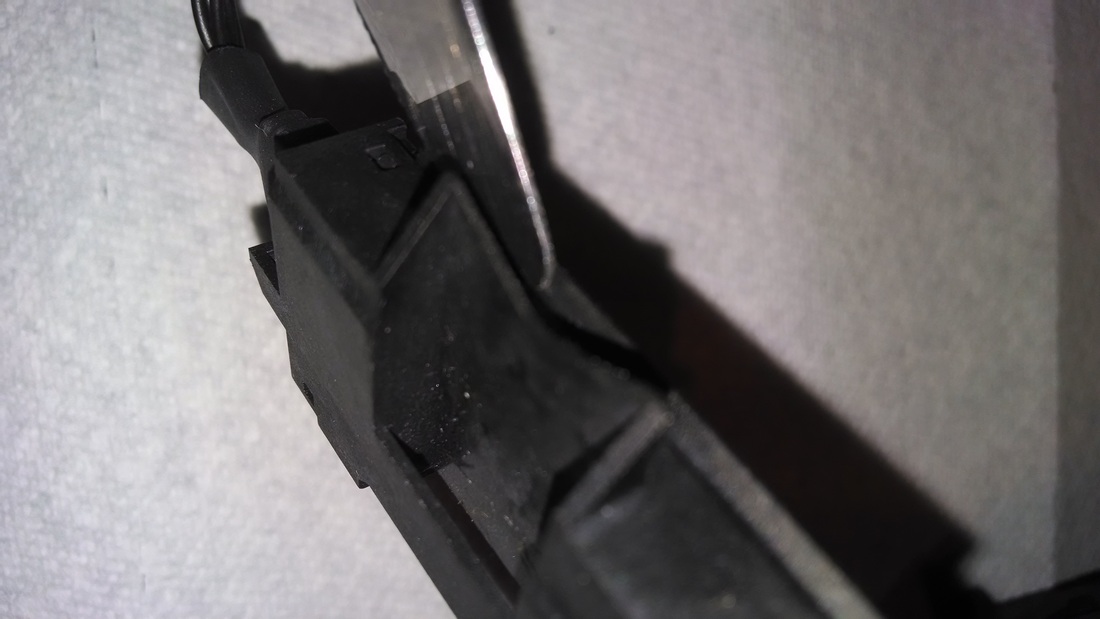 Slide a flat blade into the plastic box seam of the drop detector to force the two pieces apart. 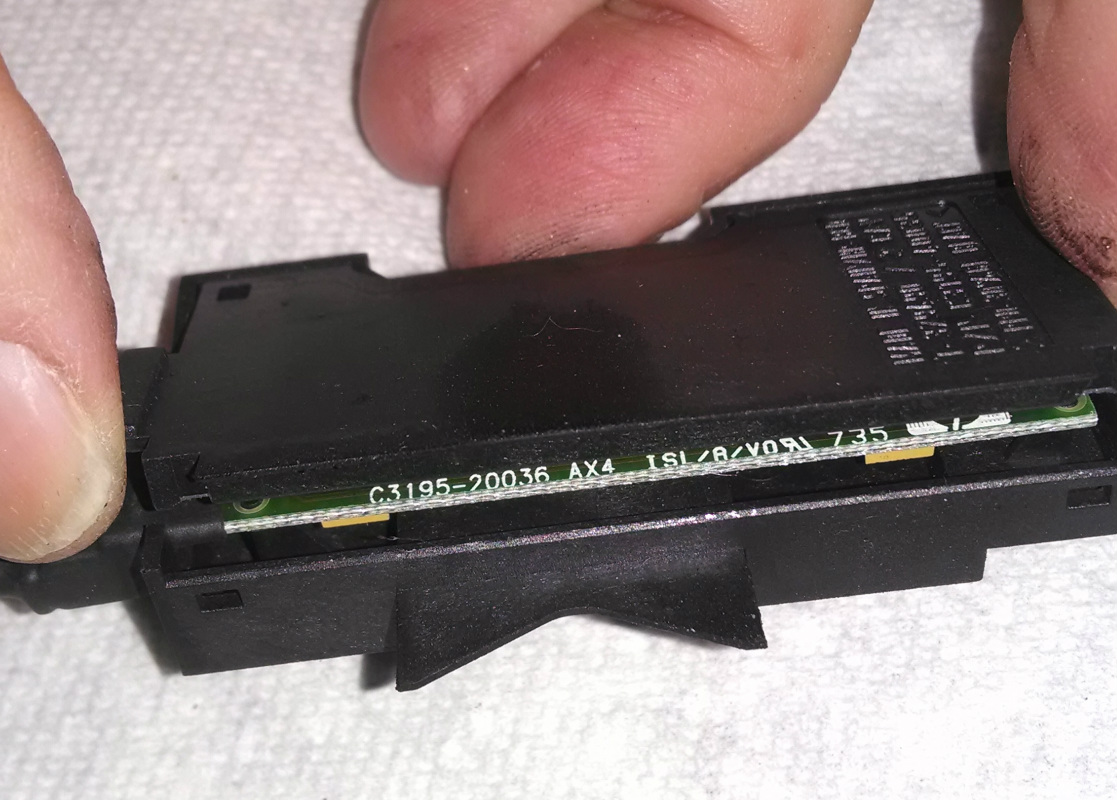 See the drop detector circuit board? Now lift the cover off and then take out the circuit board... 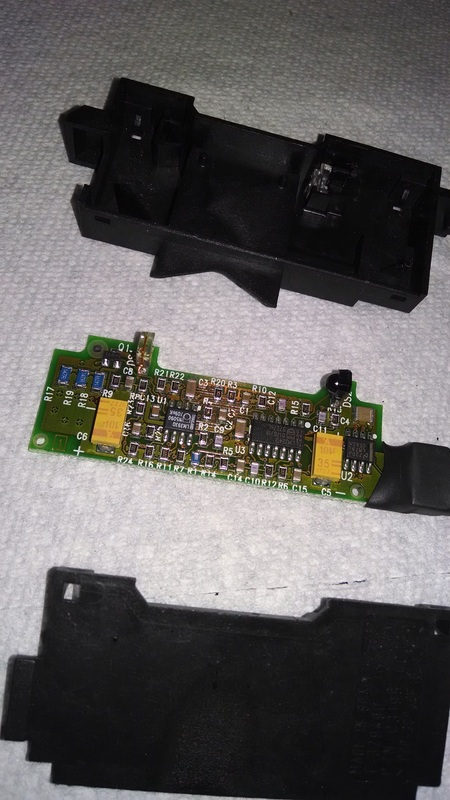 The 3 pieces that make up the drop detector. 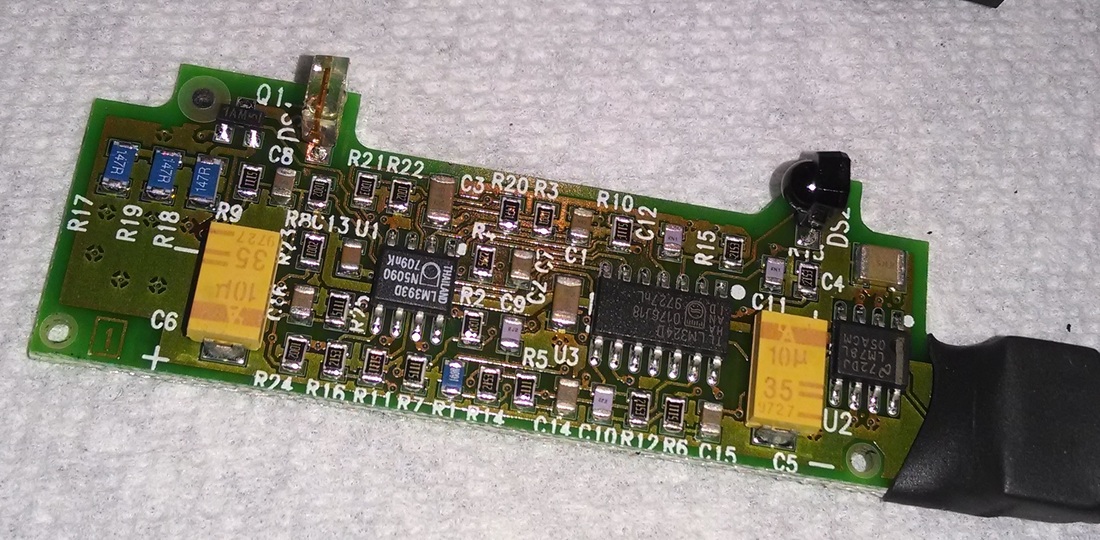 Circuit board with the round "eye" on the top right that needs to be cleaned off with a cotton tip and some alcohol...and the other piece that looks like a tiny lens (left upper) that also needs to be cleaned off. 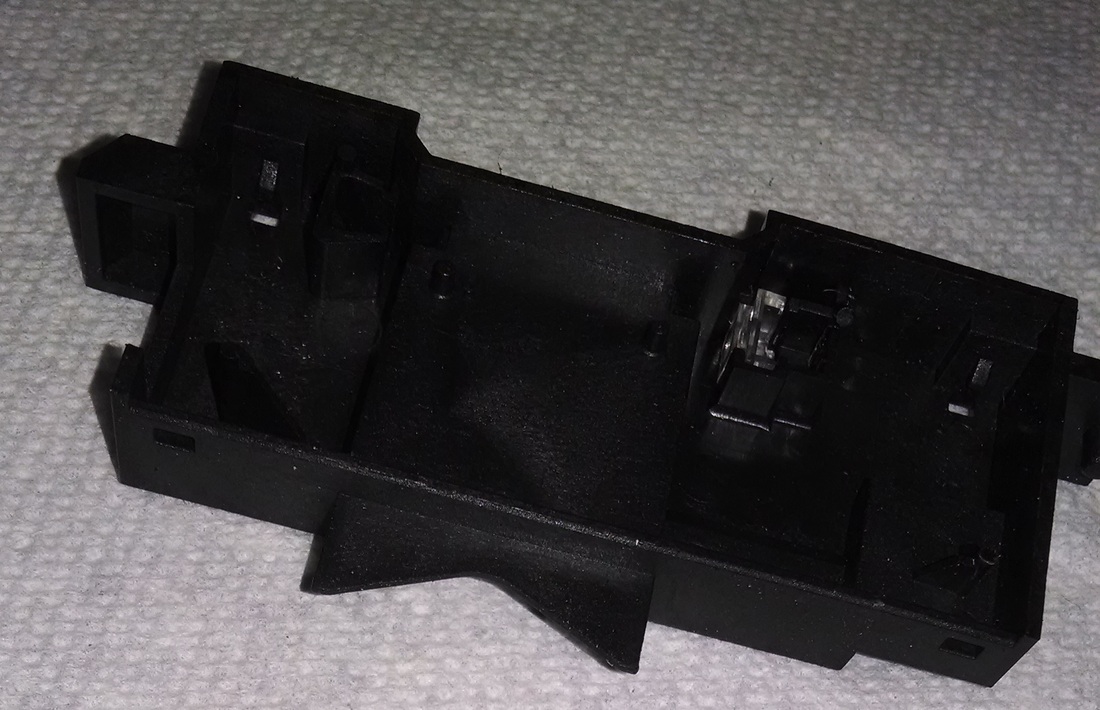 The left side of the sensor goes into the clear plastic front box on this plastic housing (right side). 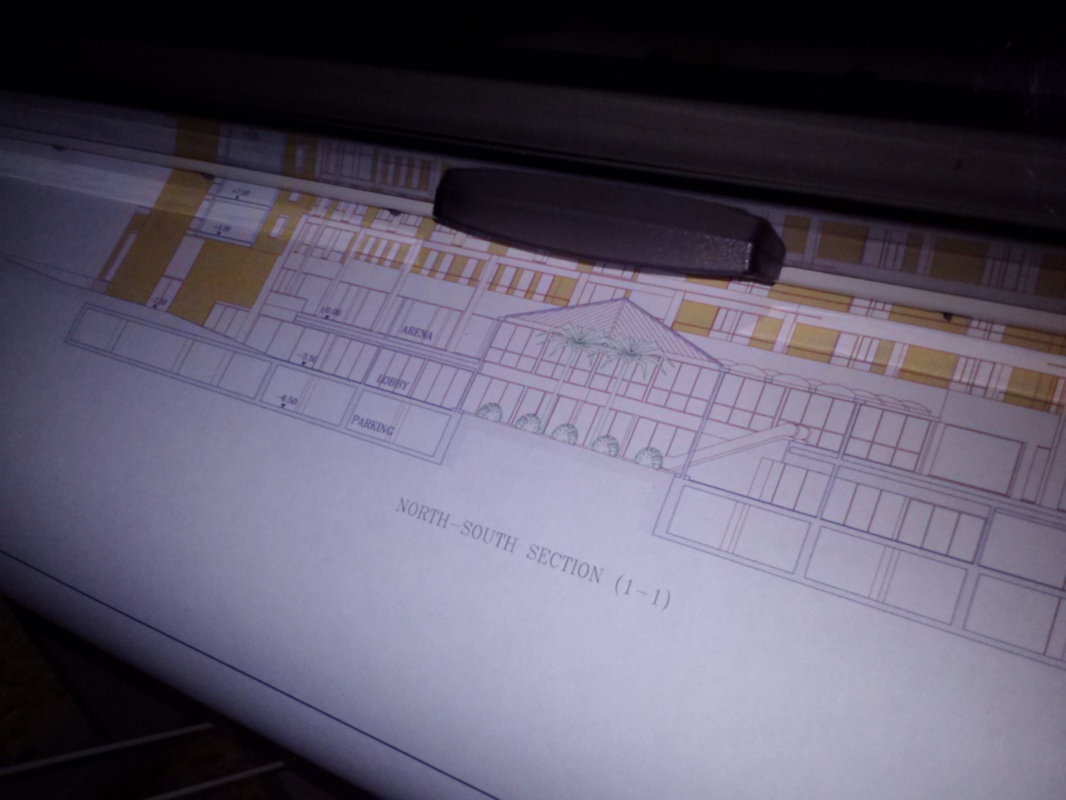 The ink drying time on your HP Designjet has changeable settings and you can get to changing the amount of time set for drying by going to the menu and changing it to MORE or LESS or NONE. Use MORE if you are doing lots off plots filled with solid blocks of inked areas...this will prevent smearing as the paper filled with ink drops onto the paper rack (or the floor if you don't have a paper rack!) If you are printing basic blueprints or line drawings and don't have big inked areas you can set it to LESS and decrease the time you wait to get your hands on things.
But even if you haven't changed the settings, you can also just push the FORM FEED button and the wait time is cancelled for that plot only, the cutter will come across and you'll quickly have the print in your hands. Jim from Michigan has shared this with us...He's figured out how to make his HP Designjet 600 print faster and with less memory consumption:
2. Flattening PDF’s for Printing -- Foxit Phantom PDF Business 6.1 will give you a free 30 day trial. Their software is very similar to the ADOBE ACROBAT Pro and the best thing is it automatically flattens PDF’s before printing thus reducing the size of the file! It also has a PDF optimizer and a Reduce Size button. All for $129.00 I was having memory issues before and now that it’s flattening the PDF’s I haven't run into any more issues. Note from the Plotter Princess: I've also found that PDF Architect is a nice $39.00 piece of PDF manipulation software. It does flattening and allows you to convert files to less memory intensive formats. Thanks to Jim for sharing with everyone! When I trip over something interesting on the way to something else I just can't ignore it, I have to share it with all the other folks who love these old plotters! Here's a FAQ from HP about the Designjet 600 and the difference between the A model and the B Model. Who would have thought there was a difference? Even the Plotter Princess doesn't know EVERYTHING!
Check out this: Section I HP DesignJet Printer (C1633B) Improvements Over The HP DesignJet Printer (C1633A)The HP DesignJet printer (C1633A) is virtually identical to the HP DesignJet printer (C1633B). The HP DesignJet printer (C1633B) has the following improvements: Major
Section II Throughput - HP DesignJet Printer (C1633A) and (C1633B) and HP DesignJet 600 PrinterThe actual plotting time for virtually any final-quality E-size plot on paper is less than 6 minutes, no matter how complex. Of course, plotting time is only one component of throughput. Transmission speed and rasterization speed must also be considered. Because HP DesignJet printers rasterize as they plot (also known as "on the fly") transmission time is a function of the type of data accepted. HP-GL/2 files are accepted at 10 KB/second, RTL files are accepted at 60 KB/second. Transmission speed is the main variable in determining total throughput. Plot times (in minutes) for all media and modes are as follows. These reflect actual plotting time only and do not include dry time. Where two times are shown, the first is for media that is rotated so the longer dimension is in the carriage travel direction. Ink Drying Time -- HP DesignJet Printer (C1633A) and (C1633B) and HP DesignJet 600 PrinterIn roll-feed mode, the printer allows time after the plot is finished before activating the automatic cutter to insure that the plot will be completely dry before being released into the output bin. Ink drying time depends on the media used, the print mode, and on the front panel selection for dry times. HP DesignJet Printer (C1633A), HP DesignJet 600 Printer In the front panel "Printer Setup" menu on the HP DesignJet 600 printer and the "Plot Mgmt" menu on the HP DesignJet printer (C1633B), the user can choose from three drying time modes: Normal (default), Fast, or None. "Normal" mode has the longest times and is best for humid conditions or for plots with heavy area fill. "Fast" mode is best for dry environments or line drawings. "None" will cut and release the plot immediately; therefore, it is recommended only when the user is standing at the printer waiting to take the plot. Drying times for each mode are: Recommended Plot Volumes -- HP DesignJet Printer (C1633A) and (C1633B) and HP DesignJet 600 PrinterTypical recommended volumes are up to 15 per day for the HP DraftMaster printers and up to 40 plots per day for the HP DesignJet printers. Note that these are just general guidelines and will depend on the size and complexity of your plots. Also, these numbers apply to normal daily usage; most users have periodic peaks when they need to produce more plots than usual. In this case, the HP DesignJet printers can reliably produce a minimum of eight E-size final plots, or the equivalent, each hour. For those customers who normally do more than 40 plots per day, HP recommends purchasing a second HP DesignJet printer. HP also recommends that the customer purchase a service contract for heavily used machines after the warranty period has expired. Logic Seeking -- HP DesignJet Printer (C1633A) and (C1633B) and HP DesignJet 600 PrinterLogic seeking speeds up throughput by only moving the pens and carriage over the areas where the image will plot. Thus, the carriage and pens do not need to make the entire trip across the media width. This is especially effective for plots without borders. Vector Parsing and Rasterization Speed -- HP DesignJet Printer (C1633A) and (C1633B) and HP DesignJet 600 PrinterThe vector parsing rate of the formatter in HP DesignJet printers is 3000 vectors/second The rasterizer in HP DesignJet printers rasterizes about 8,000 vectors/second. Note that rasterization is faster than the carriage speed and will virtually never cause overall plotting time to increase because rasterization and plotting occur simultaneously. Choice of 80960 Processor -- HP DesignJet Printer (C1633A) and (C1633B) and HP DesignJet 600 PrinterHP chose the Intel 80960 processor because the speed of this processor allowed us to perform a very fast vector-to-raster conversion without the need for special-purpose graphics ICs. Also, the 80960 is a family of processors, which gives us the flexibility to continue using the architecture for future generations of printers if appropriate. An example of this is our ability to process 600 x 600 dpi information in virtually the same time as 300 dpi information (600 only). Delay in Starting to Plot -- HP DesignJet Printer (C1633A) and (C1633B) and HP DesignJet 600 PrinterUnlike HP pen printers, HP DesignJet printers store all received plot file information before plotting. This is typical of "raster" printers, which take in vectors, or lines, and then convert the vectors to raster data or dots. When receiving vector data, all the data must be received before the plot is begun. Even with this data storage, HP DesignJet printers are significantly faster than pen printers. Section IIIImage and Print Quality 600 DPI (HP DesignJet 600 Printer Only)In Enhanced mode, the HP DesignJet 600 printer creates 600-dpi print quality. The actual resolution is 600 x 600 addressable dpi. No change of pens is necessary. The HP DesignJet 600 uses a 600-dpi vector-to-raster converter to map dots onto a 600-dpi grid. Every location on this grid is addressable at 600 dpi. Proprietary firmware algorithms calculate the exact location of ink placement to create smooth curves and straight low angle lines. Specific algorithms address the edges of filled areas to produce smooth surfaces. Dots are removed from the 600 dpi image to ensure that the same amount of ink is used for both final and enhanced modes. Because the increase in resolution requires two pen carriage passes, 600-dpi enhanced plots take twice as long to plot. 300-DPI Draft/Final Modes -- HP DesignJet Printer (C1633A) and (C1633B) and HP DesignJet 600 PrinterHP DesignJet 600 PrinterThe "final" print mode is true 300-dpi plotting; a 300-dpi pen is used and every location on the 300-dpi grid receives a drop of ink as defined by the drawing. In the "draft" mode (300 X 300 dpi addressable), although a 300-dpi pen is used, the printer selectively removes half of the ink to produce an image with lighter density. The HP DesignJet 600 printer uses a 300 X 300 dpi grid and also uses the same sophisticated algorithms as used in the 600 X 600 enhanced mode. Therefore, lines have far fewer jags, curves are smooth, and areas have crisp edges. Draft mode is the same resolution as final mode, but is up to twice as fast as final mode and from three to five times as fast as enhanced mode, and it uses half the ink. Because it uses half the ink, draft print quality contrast is reduced. HP DesignJet Printer (C1633A) and (C1633B)The HP DesignJet printer (C1633A) and (C1633B) have draft modes (150 x 300 dpi) which used a 150 X 300 dpi grid for placing ink drops. Single-Pixel Line Width -- HP DesignJet Printer (C1633A) and (C1633B) and HP DesignJet 600 PrinterThe HP DesignJet printer can plot lines as fine as 0.08 mm (1 pixel). This line width can be selected from the front panel by using the printer pen palette and selecting .13 mm line widths. Front panel line widths are expressed in terms of ISO standard line widths; actual line widths vary slightly. When using software, specify any line width smaller than .l0 mm and the printer will plot a single pixel line. Raster Mapping to 600 DPI (HP DesignJet 600 Printer Only)When 300, 400, or 406 dpi raster files are received, they are mapped onto a 300-dpi grid. Final quality is the highest quality you will get (true 300 dpi). The HP DesignJet 600 printer cannot process 600-dpi raster data files. That would require a faster processor than HP currently has. Plotting Colored Objects --HP DesignJet Printer (C1633A) and (C1633B) and HP DesignJet 600 PrinterHP DesignJet printer plot colored objects with varying shades of gray, when PALETTE = SOFTWARE on the front panel (this is the default setting). Those who want all black lines can either assign all objects to the black pen identified by the application software or set PALETTE = PRINTER on the front panel and configure the pen palettes. Section IV Nesting (HP DesignJet 600 Printer Only)The HP DesignJet 600 printer nests (placing plots side by side on the paper) any supported paper sizes. When queuing and nesting is "on" you can select either "optimal" or "in order." Optimal nesting minimizes paper waste. The printer looks ahead in the queue and groups and plots a "nest" of like-sized small plots (A/A4 - B/A3). In-order nesting, nests like-sized plots in the order they are received. The nesting time-out can be set to control the length of time the printer should wait for like-sized plots before plotting will begin. Plots with raster data cannot be rotated and therefore cannot be nested. Such files will plot individually. Supported page sizes include all those listed on the front panel(ANSI A-E, ARCH A-E, ISO A0-A4, JIS B0-B4). Make sure that the front-panel page size settings are set to match your choice of media standard (BEST ANSI/ISO/JIS/ or ARCH) to create nested plots which accurately reflect media sizes as defined by your software. Nesting is only supported for roll media. Queuing (HP DesignJet 600 Printer Only)The HP DesignJet 600 printer will queue or spool plots like the HP DraftMaster printers, although plots are held in RAM instead of on a hard disk as with the HP DraftMaster MX printer. Queuing is a basic feature of the HP DesignJet 600 printer. HP also supports the following queue operations: move plot to top of queue, replot up to 99 copies, and delete a plot. When set to "on," the queue will hold up to 32 vector or raster plots, depending on the amount of memory and file size. Queued plots are assigned a position in the queue based on order received. Each plot is identified by number of vectors or by a plot name if specified by software. Old plots are retained in the buffer after plotting if memory is available, until printer is reinitialized. Switching Print Modes -- HP DesignJet Printer (C1633A) and (C1633B) and HP DesignJet 600 PrinterHP DesignJet Printer (C1633A) and (C1633B)While plotting, you can toggle between draft and final modes. HP DesignJet 600 Printer - As above, additionally: you cannot switch to or from enhanced mode during plotting. The printer waits until the current plot is completed before selecting enhanced mode. (The 600-dpi processor is not accessible in real time.) This is indicated by a flashing light (on the front-panel print-mode LCD’s) indicating that the mode will switch at the end of the plot. Be sure to set QUEUING=ON if print mode changes are common in your workplace. You will be able to retrieve the previously plotted file from the negative queue and replot it with the newly selected print mode. (See next paragraph.) Replot and Multiple Copies (HP DesignJEt 600 Printer Only)The HP DesignJet 600 printer does not have a front panel replot button. Simply go into the QUEUE under the PLOT MANAGEMENT and move the desired file to top of queue (position #0, also known as the current plot). Select COPIES=n, where "n" is the desired # of copies. The next plot out will be the replotted one. NOTE: The queue only holds four previously plotted files, so you must retrieve a plot before it is flushed from the queue. Page Size (HP DesignJet 600 Printer Only)Page size selections in the Page Format menu work under one specific condition; if your software package allows you to scale the plot to the paper size selected, it will send the SC, or "scale" command. In this case the front-panel page size selection determines the plot size. This how the internal demo plot works. Front-panel page size selections are ignored in the following cases: Most HP-GL/2 software drivers use a PS instruction to define a page size; this software page size selection will override the front panel setting. HP-GL or HP-GL/2 software with no PS or SC instruction, plot the image in absolute printer units; in this case, the software defines the page size, and front-panel page size settings are also ignored. Expanded Margins Expanded margins, available when using roll media only, allow the plot to printed closer to the leading and trailing edges of the media. Expanded front and back margins are 10 mm (as compared to 17 mm when MARGINS=NORMAL). Side margins for all plots are 5 mm. These also apply when plots are rotated. Some applications and businesses require a maximum of 10 mm margins. No Raster Rotation -- HP DesignJet Printer (C1633A) and (C1633B) and HP DesignJet 600 printerFiles containing only raster or mixed raster and vector data cannot be rotated due to the need to plot raster data as a continuous stream; it is not sorted and re-mapped as vector data is. Also, because raster data cannot be rotated, the HP DesignJet 600 printer cannot nest plots that have raster data. Long-Axis Plotting -- HP DesignJet Printer (C1633A) and (C1633B) and HP DesignJet 600 printerThe maximum length on an HP DesignJet printer is 50 feet. Because the HP DesignJet printer does not have a take-up reel, the user will need to guide the media as it comes out. Also, memory limitations need to be taken into account. Section V Pause/Continue (HP DesignJet 600 Printer Only)PAUSE = ON selection is used to interrupt the queue so as to change media or pens. Data transmission is NOT interrupted, the current plot is completed, and the printer simply waits to plot the next plot until you have selected PAUSE=OFF. This is not an online/offline function. Automatic Cutter Operation -- HP DesignJet Printer (C1633A) and (C1633B) and HP DesignJet 600 printerThe cutter can only be disabled through software. (EC1; turns the cutter off and EC; turns the cutter on.) Note that the cutter is not activated until the plot is complete, even for long-axis plots. Media Bypass (HP DesignJet 600 Printer Only)Media bypass is used in those rare cases when poorly cut single-sheet media fails a correct media load. MEDIA BYPASS = ON allows a single sheet with up to 1.0 cm of edge skew (a squareness problem) to be loaded. You must accept the risk of plotting off the edge of the media and re-adjust your software margins to avoid this possibility. Media bypass also increases the risk of paper jams. HP recommends HP media for those who cannot purchase quality media in their region. Print Cartridge QuestionsPen Longevity, Number of Plots -- HP DesignJet Printer (C1633A) and (C1633B) and HP DesignJet 600 PrinterWith the high-volume print cartridges (HP part number 51626A), this ranges from approximately 180 plots for relatively simple E-size drawings down to about 70 plots for complex drawings. NOTE: D-size or draft mode will give twice the longevity. Print Cartridge Compatibility -- HP DesignJet Printer (C1633A) and (C1633B) and HP DesignJet 600 PrinterThe high-capacity print cartridges (HP part number 51626A) is compatible with HP DesignJet printers. The high-capacity pens have twice the ink of the current cartridges. Longevity, Shelf Life -- HP DesignJet Printer (C1633A) and (C1633B) and HP DesignJet 600 PrinterHP cannot guarantee the print quality if the expiration date on the print cartridge box has passed, but there is no risk in trying the cartridges. HP is constantly working to improve the longevity and print quality yielded by the print cartridges, so the best advice is to use cartridges with dates that have not expired. Pen Maintenance -- HP DesignJet Printer (C1633A) and (C1633B) and HP DesignJet 600 PrinterLeave the cartridges in the printer until they run out of ink. The pens are automatically capped when not in use, assuming you allow the pens to return to the "service station" on the left-hand side before turning the power off. Time to Change Print Cartridges -- HP DesignJet Printer (C1633A) and (C1633B) and HP DesignJet 600 PrinterAlthough the HP DesignJet printer does not have an out-of-ink detection system, if PEN CHECK= ON ((default setting in the Plot Mgmt. menu on the HP DesignJet Printer (C1633A) and (C1633B) and Printer Setup menu on the HP DesignJet 600 printer)), the print cartridge service station automatically checks before each plot to verify that all the nozzles are firing properly, and a "Service Pens" message appears on the front panel display if any of the nozzles fail. Before this message appears, there may be several bad plots created that should be discarded due to insufficient ink. Both cartridges need to be changed at the same time, since they use ink at a similar rate. PRINT CARTRIDGE (PEN) ALIGNMENT PROCESS -- HP DesignJet Printer (C1633A) and (C1633B) and HP DesignJet 600 printer - When the print cartridges are manufactured, the inkjet "nozzle plates" are placed on the body of the cartridge with a level of precision that is appropriate for one-cartridge printer lines. However, in order to achieve the highest print quality in the HP DesignJet printer with any two cartridges, the bodies must be adjusted so that the nozzle plates are in perfect alignment with each other. This process takes approximately 4 minutes and is only done after print cartridges are removed or replaced. The HP DesignJet printer does this by: having each print cartridge print a test pattern that is readable by the carriage sensor, adjusting one cartridge’s position mechanically with a cam while holding the other cartridge fixed, and electrically controlling dot placement. Section VI Media Print Modes -- HP DesignJet Printer (C1633A) and (C1633B) and HP DesignJet 600 PrinterTo get the optimum print quality on paper, select "paper" media on the front panel to get great draft, final, or enhanced print quality. Even more excellent quality paper images can be gotten by using paper media, but instead selecting "translucent" or "vellum" media on the front panel. This "two-pass" mode will produce excellent print quality (though at a slower speed than paper mode). Roll Media -- HP DesignJet Printer (C1633A) and (C1633B) and HP DesignJet 600 PrinterSizesThe core should have an inner diameter of 2 inches and an outer diameter of 2.125 inches. The maximum diameter of the roll is 3.8 inches. Roll widths can be 24 inches or 36 inches (also 11.6 inches in Japan). Intermediate Roll Widths - Complete testing has been done on rolls that are 24 inches or 36 inches wide. While there is no inherent reason why other sizes between 24 inches and 36 inches will not work, testing has not been performed and no guarantee can be made. Media Compatibility -- HP DesignJet Printer (C1633A) and (C1633B) and HP DesignJet 600 PrinterThe HP DesignJet printer offers very good print quality on most commonly available bond paper (including some recyclables). Alkaline bond media may exhibit area fill problems. On some translucents and a few vellums, print quality may not be acceptable. For plotting on polyester film, customers must use HP inkjet film designed specifically for use with the HP DesignJet printer. PEN PRINTER MEDIA COMPATIBILITY -- HP DesignJet Printer (C1633A) and (C1633B) and HP DesignJet 600 printerHP pen printer media can be used with the HP DesignJet printer, with the exception of polyester film (see previous answer). NO LIST OF APPROVED MEDIA -- HP DesignJet Printer (C1633A) and (C1633B) and HP DesignJet 600 printerHP does not publish a list of vendors whose media work well with the HP DesignJet printer. There are two reasons for this policy. First, the wide variety of media used in CAD applications (bond, vellum, translucent, etc.) would make comprehensive testing very difficult. Second, media formulations change frequently, so the list would be outdated quickly. Questions on FilmNeed for Special Film -- HP DesignJet Printer (C1633A) and (C1633B) and HP DesignJet 600 printerThe special film sold for the HP DesignJet printer has a top coating that allows the ink to penetrate. On standard film, the ink will bead up on the surface and may take a lot longer to dry. Film Size -- HP DesignJet Printer (C1633A) and (C1633B) and HP DesignJet 600 PrinterThe film is only sold in rolls that are 36 inches or 24 inches wide and 125 feet long. Cut sheet packages are also available. Film Plot Permanence -- HP DesignJet Printer (C1633A) and (C1633B) and HP DesignJet 600 PrinterFilm can be stacked without the plots (and images) smearing or sticking to each other as long as the normal dry time is selected from the front panel. The purpose of the dry time is to dry the ink completely. Film Archivability -- HP DesignJet Printer (C1633A) and (C1633B) and HP DesignJet 600 PrinterThe archiving spec for the HP DesignJet polyester film is for 1 year (or more) in office light, or 20 years in dark storage. In addition, it can be used for 100 or more diazo reproductions. MEDIA ERASIBILITY -- HP DesignJet Printer (C1633A) and (C1633B) and HP DesignJet 600 printerHP has tested bond, vellum and film, and the ink cannot be erased from these media. No Media Waste (HP DesignJet 600 Printer Only)There is no media waste between plots because the printer is always in paper saving mode. There are only two situations when media waste occurs: when a roll is loaded, the printer trims off approximately 5 inches (12.7cm); and when print cartridges are changed, about 16 inches (40 cm) are used for pen alignment. Media Recycling -- HP DesignJet Printer (C1633A) and (C1633B) and HP DesignJet 600 PrinterAll media used with the HP DesignJet printer can be recycled, although some recyclers may request that you separate the vellum, since it is a cotton-based product, while the bond and translucent are wood pulp based. And remember that the film would need to be returned to a plastics recycler. Section VII Memory and File Capacity QuestionsMemory Expansion Sources -- HP DesignJet Printer (C1633A) and (C1633B) and HP DesignJet 600 PrinterThe SIMMs supplied for the HP DesignJet printer are tested to work with the equipment and are purchased from specific vendors meeting HP’s high standards. Our experience is that non-HP memory usually works fine with the HP DesignJet printer. However, HP does not support other vendor’s SIMMs if they fail to work. HP’s SIMMs are 72 pin, 36 bit, 80 nanosecond. Memory Expansion, HP Part Numbers -- HP DesignJet Printer (C1633A) and (C1633B) and HP DesignJet 600 PrinterHP DesignJet 600 PrinterHP part numbers C2065A (4 MB) and C2066A (8 MB) HP DesignJet Printer (C1633A) and (C1633B)HP part numbers C2064A (2 MB) and C2065A (4 MB) Memory Expansion, RAM Capacity -- HP DesignJet Printer (C1633A) and (C1633B) and HP DesignJet 600 PrinterHP DesignJet 600 PrinterThe total RAM capacity is 20 MB. This includes the 4 MB on an internal circuit installed at the factory. There are two available SIMM expansion slots, each of which can accept either an 8 MB or 4 MB board. Thus the total RAM can be 4, 8, 12, 16, or 20 MB. The amount of RAM can always be verified by plotting the CONFIG plot. HP DesignJet Printer (C1633A) and (C1633B)The total RAM capacity is 10 MB. This includes the 2 MB on an internal circuit installed at the factory. There are two available SIMM expansion slots, each of which can accept either a 2 MB or 4 MB board (NOTE: 8 MB SIMMs will only register as 4 MB!) . Thus the total RAM can be 4, 8, 12, 16, or 20 MB. The amount of RAM can always be verified by plotting the CONFIG plot. Additional RAM Installation -- HP DesignJet Printer (C1633A) and (C1633B) and HP DesignJet 600 PrinterIf only one RAM SIMM module is installed, it must be installed in the bottom slot. If two memory modules are installed, it is recommended that the first of the two boards be installed in the top slot. The second board can then immediately be installed in the lower slot. (Product design requires that if two boards are installed, the top one go in first.) Memory, Maximum File Size -- HP DesignJet Printer (C1633A) and (C1633B) and HP DesignJet 600 PrinterHP DesignJet 600 PrinterThe HP DesignJet 600 printer’s standard 4 MB RAM will hold multiple plot files, up to approximately 3.5 MB, depending on file content. The size of the file is determined after processing. When HP-GL/2 files are sent to the printer, this compacted language is expanded into raster data which may consume larger amounts of memory than the original file sent from software. Memory usage may be especially high when an HP-GL/2 plot contains large, filled polygons; for example, an original file of 700 KB can actually exceed the 4 MB standard memory. Users with these types of plots should invest in expanded memory, especially if they want unattended nested plots. HP DesignJet Printer (C1633A) and (C1633B)The standard 2 MB RAM of the HP DesignJet printer (C1633A) and (C1633B) will hold one plot file, up to approximately 1.6 MB, depending on file content. The size of the file is determined after processing. Using the optional memory modules to expand RAM will not enable the printer to accept more than one plot. It will, however, increase the size of the file the printer can accept. Memory, Number of Vectors -- HP DesignJet Printer (C1633A) and (C1633B) and HP DesignJet 600 PrinterHP DesignJet 600 PrinterApproximately 900 K vectors, after file processing. HP DesignJet Printer (C1633A) and (C1633B)Approximately 500 K vectors, after file processing. Out of Memory Message -- HP DesignJet Printer (C1633A) and (C1633B) and HP DesignJet 600 PrinterThe front panel will display the message "Out of memory/Data was lost" when you try to download a file that is too big to fit into memory. This indicates that additional memory must be installed to plot this drawing. Memory, Raster Files -- HP DesignJet Printer (C1633A) and (C1633B) and HP DesignJet 600 PrinterThe HP DesignJet printer will download as much raster data as will fit in the memory before beginning to plot. There is no need for a complete raster file to be downloaded to memory before plotting because raster data is plotted without a vector-to-raster conversion. The advantage to adding memory for raster files is to free up the computer more quickly. Section VIII Connectivity: Interface I/O’sModular I/O’s (MIO)Current HP JetDirect Print ServersP/N Description J2550A Ethernet/802.3 (10Base-T/RJ-45) J2552A Ethernet/802.3 (10Base-T/RJ-45 and 10Base2/BNC) J2555A Token Ring/802.5 (DB9 and RJ-45) NOTE: 1) These cards are multi-protocol capable. 2) UNIX (R) Software not included. No Ethertalk and Localtalk Support -- HP DesignJet Printer (C1633A) and (C1633B) and HP DesignJet 600 PrinterThese are the only two HP JetDirect cards which the HP DesignJet printer does not support. Although these cards may physically fit in the HP DesignJet printer’s slot, they require commands found only in PCL5 and PostScript (TM), neither of which is supported by the HP DesignJet printer. HP-IB MIO Card Configuration (HP DesignJEt 600 Printer Only)NOTE: This card has been discontinued, but may still be available (October 1994)). The front panel setting in the HP DesignJet 600 printer overrides the DIP switches on the HP-IB card (HP part number C1642A). Connectivity: Other QuestionsCable Length -- HP DesignJet Printer (C1633A) and (C1633B) and HP DesignJet 600 Printer The maximum cable length for the parallel or serial interfaces is 6.9 ft. (2.1 m) for Centronics parallel and 50.0 ft. (15.2 m) for RS-232-C serial. If a non-HP Centronics cable is being used, data may be lost during transmission. If so, try using an HP cable to correct this failure. Front Panel I/O Configuration, Centronics Parallel -- HP DesignJet Printer (C1633A) and (C1633B) and HP DesignJet 600 PrinterThe HP DesignJet printer does not list interfaces like Centronics that do not require configuration. Since the HP DesignJet printer automatically scans all I/Os for data input, the user does not need to "select" the parallel port. To switch from one I/O to another, turn the printer off and on or reset the printer through the Utilities menu. Switch Boxes for Peripheral Sharing -- HP DesignJet Printer (C1633A) and (C1633B) and HP DesignJet 600 PrinterMost manual switch boxes do not have surge protection in them. HP recommends either sharing the peripherals using an electronic switch box with the appropriate surge protection, or buy another Centronics I/O board for your PC so that each peripheral has a dedicated port. Multiplexing -- HP DesignJet Printer (C1633A) and (C1633B) and HP DesignJet 600 PrinterThe printer does not have built-in multiplexing capability. There is, however, a third-party MIO card that permits up to seven concurrent users: six serial and one parallel. The card is called JetCard/DJ and is sold by Excellink, Inc. at (408) 295-9000 (U.S.). There is also the ShareSpool card by ESI (208) 322-7575 (U.S.) I/O Speeds -- HP DesignJet Printer (C1633A) and (C1633B) and HP DesignJet 600 PrinterRS-232-C (Serial)The default baud rate for the RS-232 interface on the HP DesignJet 600 printer is 9,600 (bits per second). This is roughly equivalent to 1,000 bytes per second. The highest baud rate available on the HP DesignJet Printer (C1633A) and (C1633B) is 38,400, or about 4,000 bytes per second. Centronics (Parallel)The Centronics parallel port transmits at 10,000 bytes per second or more. This is faster than the rate at which the HP DesignJet printer can accept data. No Eavesdrop Mode HP DesignJet Printer (C1633A) and (C1633B) and HP DesignJet 600 PrinterThe HP DesignJet printer does not support an eavesdrop mode off a terminal line from a mini-computer or mainframe. This fairly rare configuration is not supported. As a result, the printer would require its own port off the mini- or mainframe. Connectivity: Languages & DriversHP PRODUCT LINE HP-GL/2 COMPATIBILITY -- HP DesignJet Printer (C1633A) and (C1633B) and HP DesignJet 600 printer HP-GL/2 "hyper-drivers" (generic drivers written for any HP-GL/2-compatible machine) will provide excellent results on the HP DesignJet printer. HP encourages ISV’s to write generic drivers. ISPP Support -- HP DesignJet Printer (C1633A) and (C1633B) and HP DesignJet 600 PrinterThe HP-GL/2 Graphics Library (ISPP) support has been discontinued. HP-GL Compatibility -- HP DesignJet Printer (C1633A) and (C1633B) and HP DesignJet 600 PRINTERHP DesignJet Printer (C1633A)Does not support HP-GL language. HP DesignJet Printer (C1633B) and HP DesignJet 600 PrinterThese HP DesignJet printers work with drivers written for the 7586B version of HP-GL which is the most popular version. Section VIII Installation not Included -- HP DesignJet Printer (C1633A) and (C1633B) and HP DesignJet 600 PrinterInstallation is included only in Japan where our competitors bundle installation with the purchase price. In the rest of the world, users prefer to save money and install their own product. The ease of setup of the HP DesignJet printer is similar to that of a pen printer and does not require an engineer. Transporting the Product -- HP DesignJet Printer (C1633A) and (C1633B) and HP DesignJet 600 PrinterThe HP DesignJet printer has been built to withstand aggressive stress tests. However, if the product is to be transported after assembly for any distance (more than one city block or over rough cement terrain), certain precautions need to be observed. The media bin, legs, casters, and topcase are susceptible to damage. Types of damage include the following:
To reduce the likelihood of damage to the printer, HP recommends using certain pieces of the original packaging materials to stabilize and protect the product. This is especially important when using a van or truck for longer distance transportation. Pens and media should not be loaded in the product during transit. The spindle should be loaded and legs and media bin assembled correctly. The original cardboard packing inside the machine should be kept in place. The product legs, casters, media bin and topcase are especially susceptible to damage during transit. Legs should be wrapped with a bubble-wrap type of packaging material. Repacking Instructions (HP DesignJet 600 printer Only)Order HP part number C2847-90013, HP DesignJet 600 Printer Repacking Instructions. Kanji ROM SIMM (HP Designjet 600 Printer Only)There are two unused SIMM slots in the area where memory is inserted. The two SIMM slots were designed to accommodate customized memory modules. The only memory module which HP currently offers is the Kanji ROM SIMM which is shipped with each unit to Japan. The Kanji ROM SIMM contains two Kanji Level II fonts, a "stick" font, and an "arc" font. It does not matter which of the two slots you install a single ROM SIMM in, although the installation instructions recommend the top slot. (Kanji ROM SIMM, HP part number C2847-60031)  Windows 8 has a driver signing requirement that may keep you from using the same drivers that you used for XP or Win7. This video will show you how to disable this feature so that you CAN use that driver.
Click Here To See That Video  I've been vacationing in Florida for a few weeks and it is quickly coming to an end. Soon I'll be returning to the cold and blustery snowy local of Minnesota and get back to plotting about HP Designjet plotters! Even while I've been lounging by the pool I've been able to take calls from owners of recalcitrant plotter and help them to get their machines back to decent function...that's always fun because in the process I learn from the users and they get a new resource and friend in me! I don't charge for questions and what ever assistance I can offer, but I do take donations if you feel you want to help support this service. See my donations link on the website and give a couple dollars if you think you've been helped.
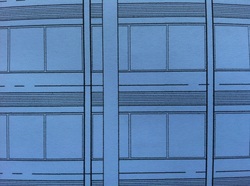 Aaron in Phoenix reports that the BLACK CARTRIDGE ALIGNMENT SHEET procedure outlined in the 430 / 450c User Manual in Chapter 5 was the solution to his problem with jagged lines as seen in the photos in a previous post and the after plot seen on the left.   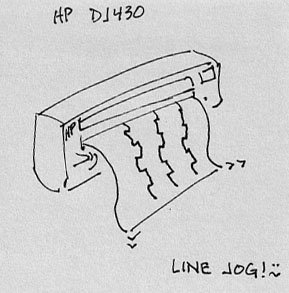 Aaron in Phoenix is looking for an answer to his 430 Designjet line jogging...I thought it might be the encoder, he replaced the encoder and the print isn't looking any better. He's also recalibrated with the print quality re-cal. Now he's getting desperate and I'm feeling like Aaron has stumped the Plotter Princess so I asked him if I could put it out there for the rest of you to help us. If you have experience and have resolved this, please leave a "comment" at the bottom of this posting. Thanks!! 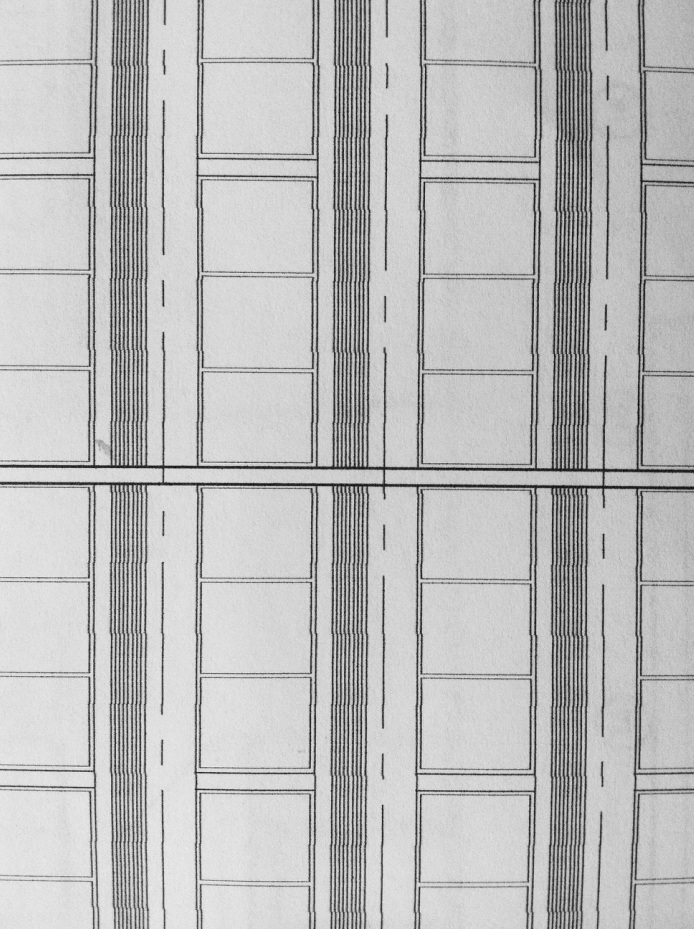
 Last week was a very hot and muggy week here in Minnesota...I had two plotters in my showroom plugged into an outlet without a surge protector...I know, I know...I tell everyone to use one all the time!! Well there was a power surge and POOF!
Both machines lost their LED displays at the same time. It was my fault...lucky that I had spare parts and was able to replace and that was all that was harmed! I will never ever go without a surge protector again!! 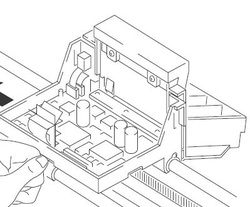 (Readers - Brad from Perth is a fellow classic plotter enthusiast and has written a second guest blog for us...Thanks Brad!)
I have a couple more tips you might not have stumbled across. My favourite is removal of the carriage with it remaining in the centre of the printer. On each side of the carriage, the two slider bushes are retained by a screw and flat washer. If you remove these, you can pop your finger under the carriage and slide the bushes out (sometimes they take quite a bit of force, but you can't damage anything with finger force). Once those are out you can work the front of the carriage up and away from the front slider rod. Then it is a matter of gently sliding it forward and off the bush on the rear. Now, the spring that tensions that rear bush has a hair trigger, and will fly quite some distance if you don't get your hand on it before sliding the carriage off. The bushes are indexed and so can't be assembled incorrectly. I like to give the fine lubricant slots in the bush faces a real good clean, as they seem to gum up badly depending on which lubricant people use. Assembly is reverse of removal. This way you don't have to remove the slider end caps or disturb the trailing cables (I ruined my first set as the glue holding the cable ends together had disintegrated and so they fell to bits as soon as I pulled them from the contacts). I've also found that as the trailing cables age, they can de-laminate around where they curl into the contacts on the carriage, and also the bend that forms where they loop out in the printer. They seem very touchy to any form of movement they are not routinely subjected to (like, oh.. say slipping with a screwdriver and belting them with the palm of your fist). Speaking of lubricant, I'm one of those sticklers for the right stuff. So I have a bottle of 6040-0855 HP synthetic lubricant that I use. It wasn't expensive, and I figure they went to the trouble of making a specific lube, so I might as well use it. At the rate I go through it I figure the bottle will last me 100 years. I also have a syringe of the right white grease for the X-axis gears, but the part number has long gone from that. It's the same stuff I use in the gears of all my laserjets, and is another HP specific goo. Again, it'll outlast me I'm sure. It turns out the synthetic lube (which is water clear when you buy it) slowly yellows with exposure to UV, so keep it in the dark (like ink). My first refill was with ink that had been sitting on my shelf for a year, and I was amazed by how much it faded in the bottle with exposure to UV. I had to drain and refill the carts with new stuff or else all my prints looked like they'd been pegged to the clothes line outside for a year. Sometimes I've had trouble with recognition of one of the cartridges, ultimately ending in the printer becoming a monochrome model. Upon dissasembly of the carriage, I put the flexible ribbon for the cart contacts under a powerful magnifying glass and spotted where one of the contacts for the offending cartridge had a break right where the copper track joined the gold contact lump. Rather than spring for a re-furbed carriage, there are a couple of e-bay stores in China that stock replacement ribbons for less than half the price of a replacement carriage. I always give these a good going over anyway as I completely disassemble the carriage for cleaning, but it turns out they are not very difficult to replace. I like your spot on the DJ500. I worked in an office for years that had an 800ps, and if I could fit it in, I'd get one. Unfortunately I need the 36" wide carriage, but the hole in my office is only just big enough for the 750, so a 42" 800 would be out of the question. Just way too wide. I've not done a great deal of research on those units, but I certainly enjoy working on the 700's, and even at 300dpi, on coated paper with good ink they do a credible job for images, and a terrific job for CAD (which is their main use here). Ink is another one. I've taken up re-filling my own carts, and saved a fortune. I pick up new (expired) carts on e-bay when I get the chance, as I find a good refill may only last 3 or 4 fills before the image quality falls off as the print head degrades, and they are only suitable for CAD. I keep about 3 full sets of carts, a acceptable, good, & best set that I swap between when I want to make something really shine. I find that the silicone wipers in the service station tend to scratch the print heads if they are allowed to get too dirty. When I refill a cart I have a good look at the head under strong magnification, and that determines which pile it gets assigned to. One of these 750's lives at my Parents house for Dad to use, so I keep some sets of carts for them also. I find that by re-filling them myself, I can keep the little green ink level indicator working, and by making sure that they are swapped out when it goes black, rather than when they fail a cartridge check, I don't tend to burn out nozzles, and the carts last more refills. I have it down now that I can do a set of 4 in about 15 minutes, but if I'm doing a batch I can probably do 3 full sets in half an hour. I do my wifes Officejet 6500a also. It's supposed to use different inks, but it does very well with the same stuff I put in the designjets. You guys are lucky in that the best ink and accessories all come from the States. Costs me a bomb in postage (relatively), but it's still miles and away cheaper than even expired carts. If it's of interest, I can detail some of the do's and don'ts I've learned about refilling too. 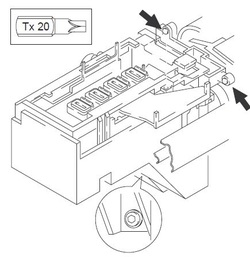 Service Station on the 750C (see item F in the blog.) Service Station on the 750C (see item F in the blog.) (Dear readers - this week I received a lovely correspondence from Brad who is, like many of us, a committed HP Designjet lover and saver! I asked Brad for permission to share his comments and he graciously said yes.)
I, like you, have a little menagerie of Designjets. In the process of buying them, re-building them and using them I've come across a couple of tips that I wondered if you might find useful. A) On a number of machines the belt tensioner is thoroughly shagged out. A bit of research showed that the bearing is a standard R4ZZ (basically a roller skate bearing) and a made in Japan version is available for less than $10 from any bearing supplier. It can be pressed out and a new one pressed in with the aid of a bench vise and some generic 3/8" drive sockets (used as mandrells). I now do these as a matter of course when I refurb a machine. B) I was getting increasingly frustrated with the rapidly fading VFD displays on my 750's, so I reverse engineered the display protocol and made a new display using a blue LCD. It will never fade, although in its current incarnation needs to be glued in with silicone. I need to make a couple more, so I'll try and neaten it up a bit for the next set. C) I got sick of the Ortho wiper blade falling off, but I had to try about 7 different adhesives until I found one that worked properly. Turns out standard Cyanoacrylate (super glue) does the job the best. I'm going to have a crack at building, moulding or fabricating new Ortho wiper blades as I just can't secure second hand ones anywhere. (Parts are significantly more difficult to come by in Australia) D) The three plastic posts that secure each end cap on the printer often fracture where the screws pull on the ends. A slice off a 14mm PVC conduit adapter makes a perfect outer ring to slide over those, and secured with some Devcon plastic welder, makes a perfect and long lasting repair. E) The o-ring that seals the base of the primer assembly appears to crack and leak with age. A smear of neutral-curing clear silicone bathroom sealant on that seals it up tight on re-assembly. F) The drop sensor board grows a furry corrosion and progressively loses sensitivity over the years. A scrub with a toothbrush and some isopropyl alcohol, and then a light spray of PCB conformal coating (put tube over the light sensors to prevent sealant getting on them!) will ensure that never happens again. G) Generic replacement trailing cables are *hard* to get right as they don't have the longitudinal curve the genuine HP cables do. Instead, I developed a technique for replacing the belt and re-building the carriage without having to remove the rail end caps, and without having to disconnect or disturb the trailing cable. I also dismantle, clean and re-grease the X-axis assembly, remove and dismantle the primer, service station, spitoon and carriage. Soak all non-electronic parts in water and clean away all remnants of ink, and then re-assemble everything. I'm constantly amazed at the amount of ink that gets into the carriage assembly around the cartridges. As you can probably tell, I'm passionate about my old technology. I'm lucky having a wife that understands. (She even understands my similar dedication to old Volvos). I have been contemplating starting a blog to document this stuff, but then I accidentally stumbled across yours and thought perhaps I could feed you information instead. Anything you are not already across could contribute to the available wisdom. Regards, Brad |