MyOldDesignjet.com
  • Home
  • I Save Designjets!
  • INK
  • Cables
  • The Plotter Princess Blog
  • Ask the Plotter Princess
  • Pay / Donate
  • Drivers
  • Files
  • Screaming Cat?
  • Designjet Manuals
  • Reviews
  • Get UP After A Fall
  • Shower Chair
​As an Amazon Associate I earn from qualifying purchases.

John B - New trailing cable solved 430 problem of not printing the whole print.

7/30/2020

0 Comments


"My 430 plotter would intermittently only plot a few inches of the drawing. The carriage would keep moving, but no ink was being deployed. This would go on for a few plots and then it would plot the full sheet. It would also give me cartridge errors intermittently too. This went off & on for over 2 years. I purchased an electronic module and replaced it with no change. I cleaned the cartridge contacts and changed the cable to the computer. This too resulted in no change. Finally I replace the trailing cable and instantly my machine is plotting fully again. The thought was that the trailing cable, which constantly flexes when plotting, has a wire or wires that broke but were still making contact some of the time. Thereby giving me the intermittent problem."

​Thank you John for sharing this info!
​

Trailing Cable for HP DesignJet 230 250C 330 350C 430 450 488 Printer Trailing Cable C4714-60181 - $77
0 Comments

Basic Orientation to 450c & 430 Designjet

4/13/2020

0 Comments

 
​HP Designjet 450c or 430 Orientation

 
  • Really good plotter for basic blueprint use
  • Comes in 24" and 36"
  • Lightweight - 24" is 57 pounds & 36" is 68 pounds
  • Smaller size than others: 24" is 40 inches wide & 36" is 52" wide
  • Comes with a stand, but can also sit on a shelf with the small rubber legs that are already installed on bottom of plotter
  • No extra buzzers or whistles - easy to use
  • Standard Memory 4MB
  • Maximum Upgrade Memory 32MB
  • 24" will print a 24" wide print in 1.5 minutes on FAST print - 5 minutes on BEST print. FAST print saves ink. BEST print uses 3X the ink! So use FAST if it is good enough for what you are printing.
  • Can print on sheets and roll paper. Paper as small as 8.5 x 11 and as big as 24" x 60 feet.
  • Can print on standard papers: bond, glossy, film, vellum, etc
  • Uses HP Ink Cartridges: #40 Black and #44 Cyan, Yellow and Magenta – the black ones are getting hard to find. If you order “refilled or remanufactured” cartridges some of them might not work, because most refillers don’t test them before refilling.

    Anatomy of the machine - Carriage rests on service station on LEFT and cutter sits on RIGHT. Spittoon is on right. Lid lifts and switch stops the machine. You can trick the switch. Paper roll holder. Stand. Bin. Back of Machine: Parallel connector, serial connector, electrical, Memory door

    Light Panel: Ready Light - if it is blinking it is thinking. Don't touch anything!

    Loading Roll Paper: Don't even try until the Plotter turns on the LOAD MEDIA light. Press the MEDIA TYPE "Roll" button. Pull out an arm's length, feed into slot, press blue button with thumb and paper will begin to load. Bail will lift, paper will slide under bail, bail will drop onto paper and paper will come out the front of the plotter. Next the ALIGN MEDIA light will come on and the bail will lift again...you will align media by dropping blue lever and pulling paper to line up right side. Lift blue lever again. Carriage will come out and check your work. If you've done good the cutter will trim off excess. If you haven't properly aligned the paper the plotter will spit it out and once again tell you to LOAD PAPER.

    Cutter is not electronic, only mechanical. At rest on right side of plotter. Is brought out in ROLLER mode only... not needed in SHEET mode. At end of each page cutter is brought out by the carriage and dragged across the paper. Carriage connects by magnetic charge.

    Carriage: You can move Carriage by moving belt when plotter is OFF. Holds 4 ink cartridges. These cartridges have both printhead AND ink reservoir. Brass looking strips on cartridge matches brassy bumps on strips inside carriage. Only install cartridges when machine is on. When you put in a new cartridge the READY light will blink 3 times. If it doesn't, it isn't being recognized and won't work. You can clean contacts. If that doesn't work, try SPIT... also known as saliva. If nothing works, you may need a new cartridge. If still nothing works, you probably need a new carriage.

    How to connect to a computer - Must get a bidirectional USB to Parallel Cable. It must be bi-directional and say that on the packaging – if it doesn’t say it, it is not bidirectional. You can't use a USB extension cord and most USB multiple outlet hubs also don't work well. When you load the driver you must not choose LPT-1, but instead drop down the menu and choose one of the Virtual USB ports – like USB 001, USB Virtual Port 002, 003 USB Virtual Port. Usually using the USB port with the highest number will work.

Network can connect via a HP External Jetdirect Box – There is no internal card on this plotter.

Leave the plotter ON and connected to electricity via a surge protector. It hibernates nicely and uses no electricity when it isn't processing. Don't turn it off unless it gets into a suspended error code where there's nothing left to do.

Paper Jams: The moment you hear paper crashing you can do one of three things - Push power button, disconnect from electrical power, drop the clutch lever. The preferred option is pushing the power button because the plotter will need to "re-set" itself. After you've turned it off, push the clutch lever down, manually move the carriage away from the scene of the accident, to the left or right as is convenient. Now pull the paper out of the plotter making sure that all pieces are accounted for...as a small fragment of paper can make problems later. If there is paper under the roller use a file folder or thin cardboard to push under the roller and then slide from left to right to push any paper remnants up to where you can grab them.

Lubrication: Use Mineral Oil (aka: Baby Oil) or Tri-flow Oil. Do not use WD40 or grease of any type. While plotter is off put 2-3 drops of oil on the rail that the carriage slides on. Now grabbing the black carriage belt, drag the carriage from the left to right and back again letting the carriage distribute the oil evenly. Also drag the cutter across the fresh oil. If you see black debris on the rail, take a towel wipe of the rail and repeat the oil process until you don’t get any debris back. This process has cleaned some of the accumulated dust and gunk from under the bushings.  How often should you do this? Every 2-3 months. If you can't remember when you last did it, you should do it again!

Encoder Strip: The encoder strip tells the carriage where to be on its travels from left to right and back again. The plastic silver strip has hundreds of miniscule marks on it. You'll know it is misbehaving if your carriage starts and stops in unusual spots.  Clean only with water and a soft cloth…don’t use alcohol or window cleaner…don’t try to get all the black off…just get rid of marks that
may confuse or obscure the tiny lines.


Error Messages: Most error messages are able to be cancelled by the user. If that doesn't work, you'll need to look up the error message in the User Guide or just put it into a Google search like this: "Data + Cartridge Error Designjet 450C" or go to HP.com Wide Format Forums.

User Guide: The user guide can be found at many places on the internet. It is made for the user to learn the basics of operation.
Service Manual: The service guide can also be found on the internet and it is used by repair technicians to figure out and repair whatever is wrong with the plotter.

Resuscitating Cartridges:
A misbehaving cartridge can sometimes be fixed by doing these things in order.
1) Hold under running hot water, shake it and look for two lines of ink when pressed to a damp folded paper towel.
2) Soak for an hour in a quart of hot water with a hearty squirt of liquid dish soap and a quarter cup of ammonia - then shake hard and look for two parallel lines on a damp folded paper towel.
3) Fold up 4 or 5 very wet paper towels until you have at least an inch tall gob of towel. Press down slowly and firmly then release slowly and the towels will create suction as they return to their original depth.

​
 
0 Comments

Amazing Designjet videos

10/26/2019

0 Comments

 
I tripped over this amazing HP Designjet Video page while looking for the answer to a customer's question. They have helpful videos for almost every model! To open the videos on their site right click on the photo for the video you want and choose "Open link in new window" --- 
Click here for ALL the videos!
0 Comments

is it the printer or my computer that's causing the problem?

4/8/2019

0 Comments

 
0 Comments

Calibrate the black cartridge on the designjet 430 to get rid of jagged lines

4/4/2019

0 Comments

 
0 Comments

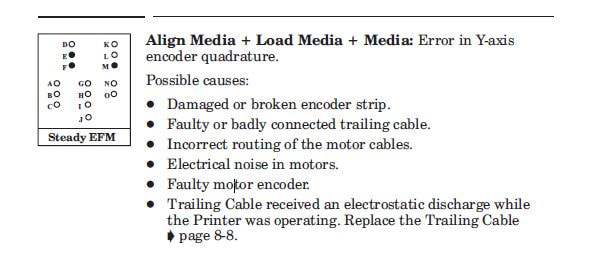
Designjet 450 430 Load+Align+Media error

11/5/2017

0 Comments

 
 I was working on getting a 450c Designjet refurbished today. New belt, cleaned up inside and out, fresh spittoon and oiled the rail. Thinking all was ok, I put the covers back on and got ready to print. BOOGERS! The LOAD + ALIGN + MEDIA lights were on and I wasn't sure what it was that was causing this.

​Looking in the service manual I found a number of things it could be. I decided to try the easiest thing and wiped down the encoder strip with a soft damp paper towel. Don't Use Alcohol If You Try This - just warm water! Wiped it all the way across from far left to far right. As I was wiping I noticed a couple of ink smudges on the encoder strip. They came right up on the paper towel.

Then with the plotter turned off I moved the carriage to the middle of the machine and restarted it. This lets the carriage "refind" itself with the clean encoder strip which is the GPS of the plotter. It tells the carriage where to be from left to right. IT WORKED!

​Below you can see the suggestions from the service manual.
Picture
0 Comments


    Buy designjet Ink & supplies here!

    ___

    Call Me
    651*247*3022

    __

    ​If I helped you to solve your problem and/or helped you save a few dollars, you may wish to donate a dollar or two to help keep this service available.
    ​
    Donate Now

    Categories

    All
    Buying
    CAD
    Designjet 430
    Designjet 450
    Designjet 500
    Designjet 600 / 650
    Designjet 800
    Drivers
    Etc)
    History
    Ink Cartridges
    Ink Cartridges
    Installing
    Media (Paper
    Misc
    Network
    PDF's
    Ports
    Princess Picks
    Printing
    Troubleshooting
    Win 10
    Win 8

    # 40 Refilled Ink
    # 40 Refilled Ink
    5188-6700, C3190-60095,       C4705-60082, C1633-40082 C2990A, C2991A 5063-1257 C2951A, 5063-1256,       C2913A, 17302A, 31391A C4713-60181, C4713-60182,      C3180-60012, A6144-63008,    C4699-60082, 51644CA,       51644CE, 51644CL,       51640A, 51644C, 51644M,       51644Y, 51640AA,     51640AE. 51640AL,     51644MA,51644ME,     51644ML,51644YA,51644YE 51644YL, C4713-40038,     C4699-40003,C4699-40004,   C4699-00015,C3190-60082,     C4699-40005,C3192-60001,     C4699-60078,C3174-40011,     C3876A, C3886A,51642A,     C4696-60006,C3190-40029,     C4704-60095,C3190-40041,     C3190-40052,J3258-61041,     J2591-69001, J2594-69001,     J3258B, J2591A, J4102B,     J2590A, J4101B, J3264A,       J3265G, C3190-40045,       C3178-00030, C4705-00017,     C4696-60007, C6074-60460,     6040-0858, C3146-67901,       C4699-60074, C4699-69039,     J3265-69001, J2382-69003,     J4102-69022, J2592-69001,     J2590-69001, C4699-60064,     C3190-60145, C4699-00008,     C4699-60020, C4699-60011,     C4699-60015,C4699-60014,     C4699-60017,C4699-60018,     C4699-60012,C4699-60019,     C4699-60016,C4699-60013,     C4699-60081,5188-5676,       0957-2340,0950-2623,       C4699-60003, C3190-60132,     5183-5268,5184-2833,     C3190-60096, C4699-60042,     C3174-60013,C3190-60140,     C3190-60142,C4713-60123,     C6072-60286,C3174-60005,     C4699-60002,C3190-80010,     C1633-80005,C3192A,       C4713-60098

Contact the princess at
​651-247-3022

Photo from Frank Boston