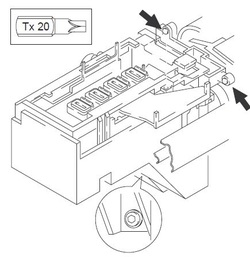
 Service Station on the 750C (see item F in the blog.)
 (Dear readers - this week I received a lovely correspondence from Brad who is, like many of us, a committed HP Designjet lover and saver! I asked Brad for permission to share his comments and he graciously said yes.)
I, like you, have a little menagerie of Designjets. In the process of buying them, re-building them and using them I've come across a couple of tips that I wondered if you might find useful.
A) On a number of machines the belt tensioner is thoroughly shagged out. A bit of research showed that the bearing is a standard R4ZZ (basically a roller skate bearing) and a made in Japan version is available for less than $10 from any bearing supplier. It can be pressed out and a new one pressed in with the aid of a bench vise and some generic 3/8" drive sockets (used as mandrells). I now do these as a matter of course when I refurb a machine.
B) I was getting increasingly frustrated with the rapidly fading VFD displays on my 750's, so I reverse engineered the display protocol and made a new display using a blue LCD. It will never fade, although in its current incarnation needs to be glued in with silicone. I need to make a couple more, so I'll try and neaten it up a bit for the next set.
C) I got sick of the Ortho wiper blade falling off, but I had to try about 7 different adhesives until I found one that worked properly. Turns out standard Cyanoacrylate (super glue) does the job the best. I'm going to have a crack at building, moulding or fabricating new Ortho wiper blades as I just can't secure second hand ones anywhere. (Parts are significantly more difficult to come by in Australia)
D) The three plastic posts that secure each end cap on the printer often fracture where the screws pull on the ends. A slice off a 14mm PVC conduit adapter makes a perfect outer ring to slide over those, and secured with some Devcon plastic welder, makes a perfect and long lasting repair.
E) The o-ring that seals the base of the primer assembly appears to crack and leak with age. A smear of neutral-curing clear silicone bathroom sealant on that seals it up tight on re-assembly.
F) The drop sensor board grows a furry corrosion and progressively loses sensitivity over the years. A scrub with a toothbrush and some isopropyl alcohol, and then a light spray of PCB conformal coating (put tube over the light sensors to prevent sealant getting on them!) will ensure that never happens again.
G) Generic replacement trailing cables are *hard* to get right as they don't have the longitudinal curve the genuine HP cables do. Instead, I developed a technique for replacing the belt and re-building the carriage without having to remove the rail end caps, and without having to disconnect or disturb the trailing cable.
I also dismantle, clean and re-grease the X-axis assembly, remove and dismantle the primer, service station, spitoon and carriage. Soak all non-electronic parts in water and clean away all remnants of ink, and then re-assemble everything. I'm constantly amazed at the amount of ink that gets into the carriage assembly around the cartridges.
As you can probably tell, I'm passionate about my old technology. I'm lucky having a wife that understands. (She even understands my similar dedication to old Volvos).
I have been contemplating starting a blog to document this stuff, but then I accidentally stumbled across yours and thought perhaps I could feed you information instead. Anything you are not already across could contribute to the available wisdom.
Regards,
Brad