|
|
|
Jerry called from Pottstown PA and needed a few parts to put his old Designjet back together. He'd been lucky enough to get his hands on a cheap machine that was missing a spindle and hubs for the paper rolls. I was happy to sell him these things and popped them in the mail the next time I went to town.. Jerry also replaced the belt, cleaned up the inside and oiled the rails to make this classic wide format printer ready to print.
He even bought the correct USB to Parallel BI-DIRECTIONAL cable from my SUPPLIES page.
He called me the next day and paid me to turn off the driver signing requirement in Windows 10, download the correct driver, choose the port and we finished the printer install.
I talked him through putting the paper roll on the spindle -- making sure it was TIGHT up against the right stationery hub. He pulled out enough paper to come to his nose as he stood in front of the plotter. Feeding it into the plotter, he lined up the right side of the paper with the perforated holes on the plotter. The printer grabbed the paper and fed it until it came back out the front of the machine. "What does align the paper mean?," he asked me. I told him to flip up the blue lever (also known to me as the clutch lever.) Next I told him to pull the paper by the two corners while looking at the right side and making it as tight to match on the right as possible. This guarantees it will be seen by the plotter as square on and could even print a 10 foot banner without the print skewing by the end. It seemed fine. He put the lever back and we tried a print. Watching it in the queue it didn't error, but Jerry yelled "Oh dang it!" and told me the carriage had caught the right side of the paper on its return from the trip to the right and bunched the paper up. We re-loaded the paper about 10 more times that afternoon. I asked him to look at the star wheels and see if they all rotated properly. He said he couldn't figure out what I was talking about. We finally took a break before Jerry gave up and threw the darned thing out of his house.
Once he'd recovered from the trauma of all this "learning" he sent me a photo of the printer with the lid up. I laughed and laughed. Then I picked up my phone and called him to tell him he had no bail. A bail is a black bar that automatically lifts up when the paper is loaded so the paper can slip under and then the bail drops onto the paper to hold it down while printing. Along the bail are about 10 small black plastic pieces with little wheels that have tiny needles on the points of the stars that help keep the paper moving straight forward.
Of course I found a bail for his printer and mailed it immediately! When it came he called and I talked him through installing it. He kept saying "Now that makes sense!" as he looked at how the bail works. We don't often think about the bail since it is a non-electronic part, but without it your paper won't load properly and your carriage will crash into the paper and you just can't print!
Thus ends the story of how Jerry got bailed out!
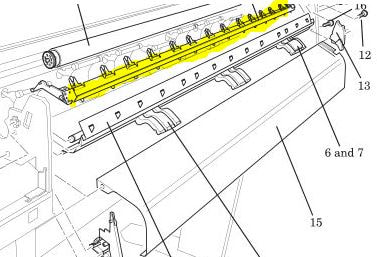
The BAIL on this printer is shown in YELLOW highlight above.